Basic usage
Buttons, buttons everywhere
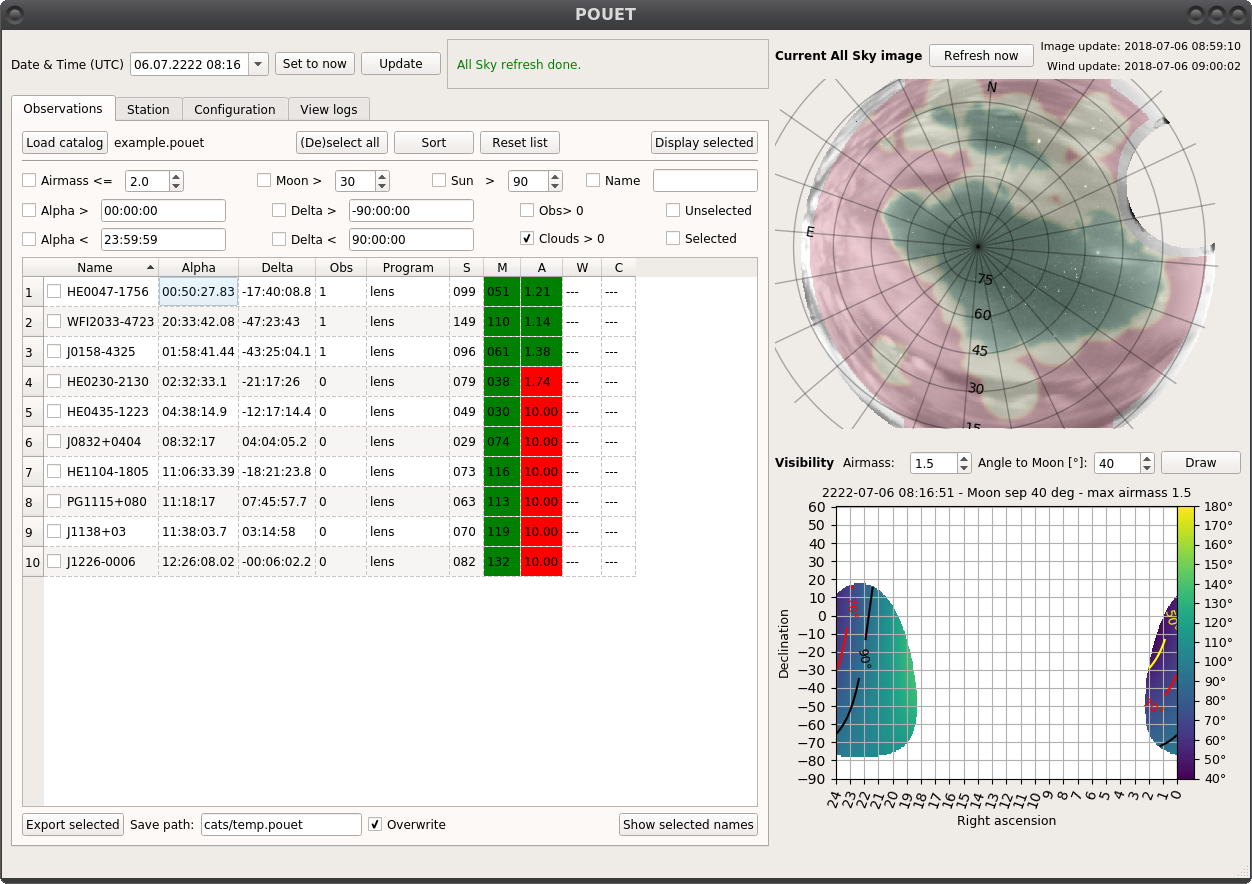
And they all serve a purpose. Let’s have a look again at what a freshly opened session of POUET looks like:
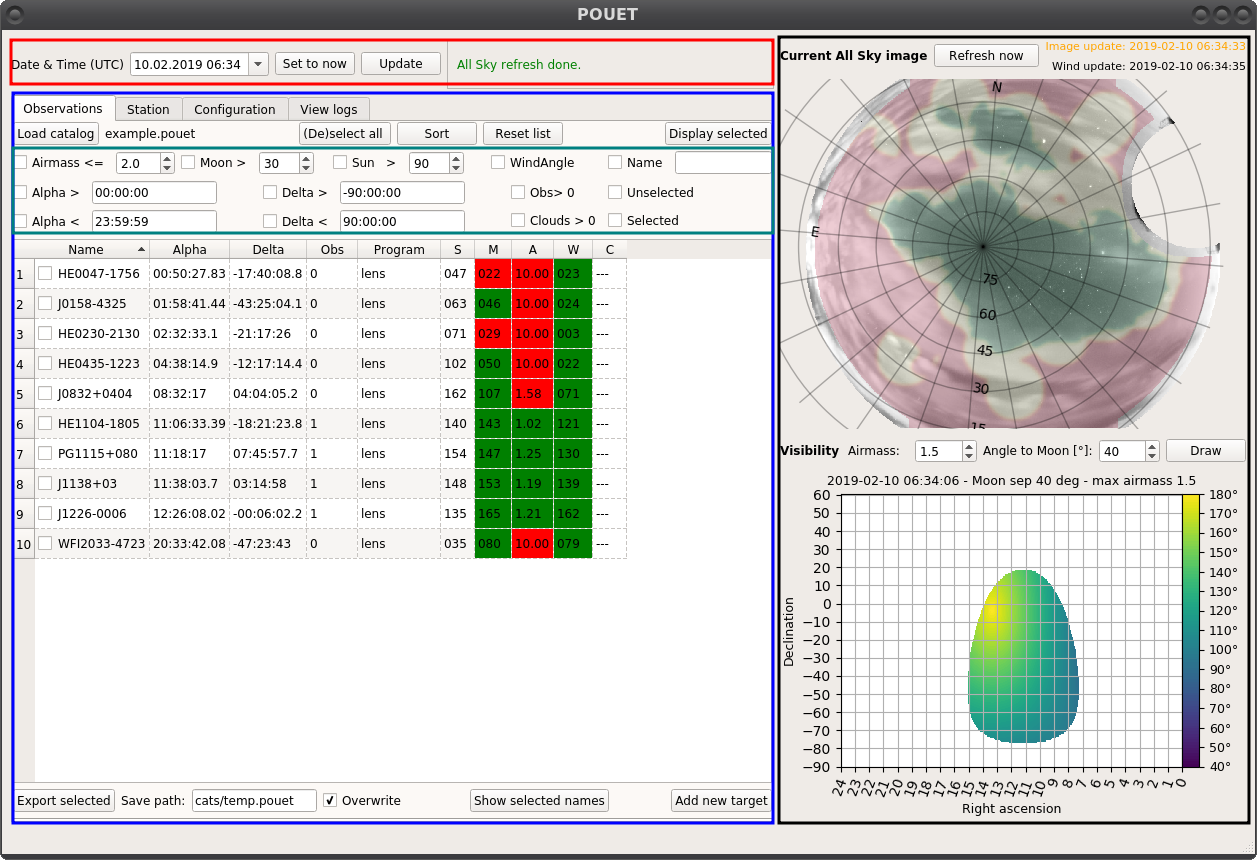
A fresh POUET session, colored for the occasion
The red box at the top allows you to control the date and time.
The blue bow below allows you to display and check the properties of the targets in your catalog - from the Observations tab. The other tabs allow you to display observing site properties (Station tab), POUET parameters (Configuration tab) and see the log of the operations you performed so far (View logs tab).
The inserted turquoise box allows a finer control of which targets are visible in the Observations tab.
The black box on the right contains the all sky display and visibility plots.
We will explore in more details these sections later on. For the moment, let’s start by importing a bunch of targets into POUET.
Import a catalog
POUET has been primarly designed to let you browse through a large list of targets (a catalog) and highligh/display only the targets of interest.
Thus, your targets need to be arranged in a catalog. A POUET catalog can be as simple as a tab separated file, where each line is a target and each column a property. The first line is a header and second line is a separator. The minimal required properties are the name, alpha (HH:MM:SS.sss) and delta coordinates (DD:MM:SS.sss). A minimal working catalog should look like this:
name  alpha   delta
----  -----   -----
HE0047-1756   00:50:27.83     -17:40:08.8
J0158-4325    01:58:41.44     -43:25:04.1
HE0230-2130   02:32:33.1      -21:17:26
HE0435-1223   04:38:14.9      -12:17:14.4
The reading is done by rdbimport(), which is a simple wrapper around astropy.table.Table.read(). Whatever suits astropy should work with POUET as well.
Note
If you do not have a separator line, you should use data_start=1 in the astropy.table.Table.read() called in rdbimport().
To load your catalog in POUET, clic on Load catalog and chose your file. Then, if the file extension is not .pouet (more on this on the Quality of Life Improvements page), a popup will appear:

Headers selection pop-up
The pop-up asks you to associate the headers found in your catalog with the ones POUET needs. The fourth header, called Obs program, is optional. It relates to the observing program associated to your targets. The observing program defines a set of properties that some of your targets share. Currently, this is limited to the minimal distance to the Moon and the maximum airmass of your target. If you do not have such a property, simply select None. Below, you can chose a default observing program for the targets that have none assigned.
Note
currently, the properties of each observing program are simply used to raise warning flags if your targets are too close to the moon or at too high airmass. It does not prevent your targets to be displayed in POUET, so you can feel safe to use the default observing program (max airmass = 1.5, minimal distance to the moon = 30 deg). Learn how to define your own observing program on the Quality of Life Improvements page.
The append checkbox in the bottom part of the loading pop-up allows you define if you want to append the targets you are loading to the ones already in POUET, or if you want to overwrite them.
Note
if you append targets that are duplicate of existing ones, they will not be loaded. However, if the original targets were hidden (see more below about that), loading duplicates will make the original corresponding targets visible again.
Once a catalog is loaded, all its targets appear in the list view. Try to load the example.cat catalog available on the cats folder, chosing the lens obsprogram. The output should look as follows:
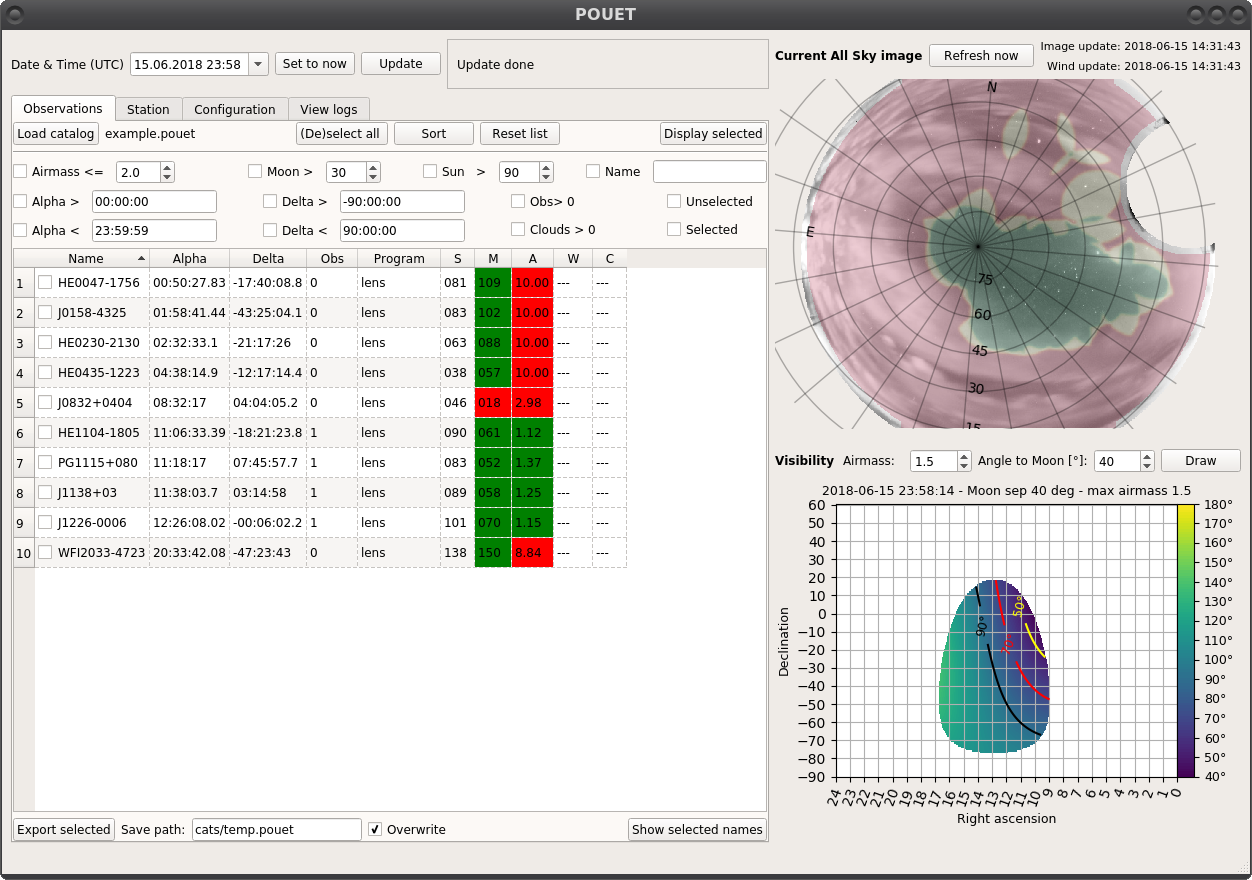
Loading the example catalog of lensed quasars.
Each target appear as a line in the list view. Non-straightforwardly understandable header keywords are:
Obsfor the observability [0-1]Sfor the angular distance to the Sun [degree]Mfor the angular distance to the Moon [degree]Afor the airmass [1-10]Wfor the angle between the telescope and the wind direction [degree]Cfor the cloud index [0-1]
The keyword cells get colored in green or red, depending if the current value matches the obsprogram constraints or not. A description of the wind angle can be found on the ref:warningmessages page. The observability and cloud index are detailed in the following section.
Note
The wind angle and cloud index are displayed only if the observing time is less than 30min off from the actual time.
Finally, you can manually add single targets on the fly to the current list of targets by clicking the Add new target button in the bottom right corner of the list view.
Warning
Be aware that POUET does not check that the name of the targets added manually are not duplicates of existing targets.
Sort your targets
You can order the list view by clicking on the corresponding headers. Sorting which targets appear in the list view is done through buttons in the small turquoise box of Fig. main_colored. Check the box corresponding on the criteria you want to apply to your list, and enter a value if needed. You can of course mix criteria as it suits you. To apply your sorting criteria, click on the Sort button.
The sorting criteria are the following:
- Airmass smaller than
- Sun distance larger than [degree]
- Moon distance larger than [degree]
- Wind Angle larger than 90 [degree]
- Name containing [string pattern]
- Right Ascension (Alpha) earlier/later than [HH:MM:SS], from 00:00:00 to 24:00:00
- Declination (Delta) higher/lower than [DD:MM:SS], from -90:00:00 to +90:00:00
- Clouds index larger than 0. 1 means clear sky, 0 means full cloud coverage.
- Observability larger than 0. The observability is a combination of airmass, moon distance, wind, cloud coverage, etc… that provide a “smart” way of sorting targets.
- Selected/unselected targets. You can check targets in the list directly.
Note
The value of the wind angle below which your targets are hidden (default = 90 degrees) can be changed in the configuration file (see POUET configuration files).
Note
In future versions of POUET, users will be able to define their own observability formula per observing program. The default one currently used can be read at compute_observability().
The Reset list button make all the targets visible again. The same can be achieved by unchecking the sorting boxes and clicking on the Sort button.
If you sort the example.cat catalog with a right ascension later than 10h, a declination smaller than 50 degrees, an airmass smaller than 0.3 and keep only the targets that have “J1” in their name, you should have only two targets remaining:
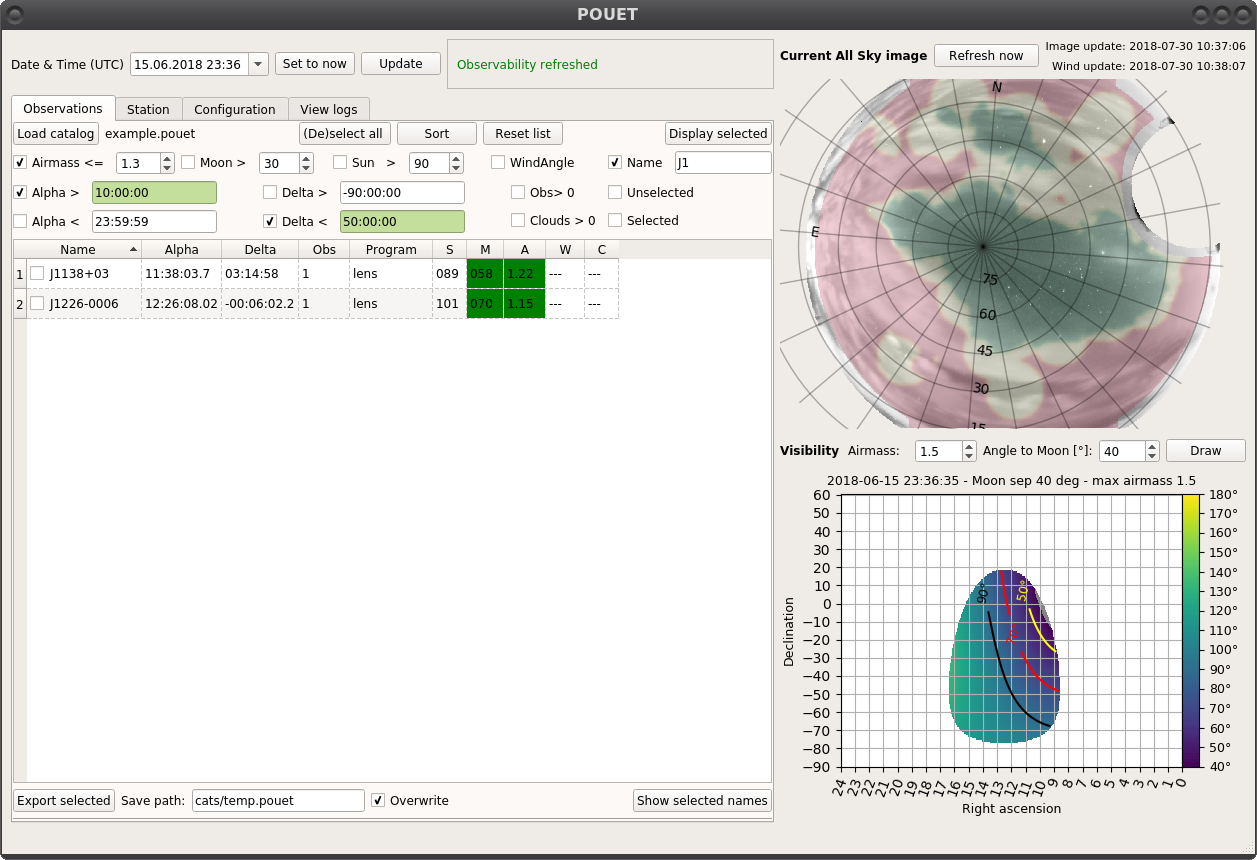
Sorting the example catalog of lensed quasars.
Display targets on the all-sky and visibility views
The right part of POUET’s main window regroups two views. At the top is the all-sky view, and at the bottom is the visibility view.
The all-sky view is, as its name says, an all-sky view from La Silla. The image comes from the Danish telescope AllSky Camera, and is refreshed by default every 2 minutes. A RA/DEC grid is superposed on top of it, as well as a cloud analysis layer that colors the view according to the cloud coverage. At the top of the plot are displayed the date of the last update of the all-sky and the wind (see Understand the warning messages) as well as a Refresh button, especially useful is you deactivate the automatic updates (see Extra tabs).
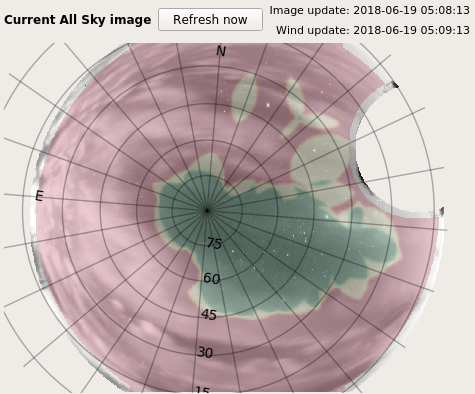
All-sky view
The visibility view is a RA/DEC plot that indicates which region of the sky can be observed according to two criterias: the angle to the Moon, and the airmass. You can change the values at the top of the view and then click Draw to display a new region. The color of the visible region corresponds to the angle to the Moon, indicated in the right colorbar.
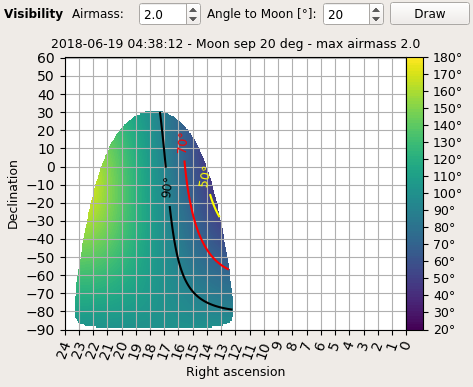
Visibility view
Note
If you hover the mouse cursor over the visibility view, a marker appears on the all-sky view at the corresponding coordinates.
If you check some targets on the list view and click on Display selected, they will appear on the corresponding coordinates on both the all-sky and visibility views.
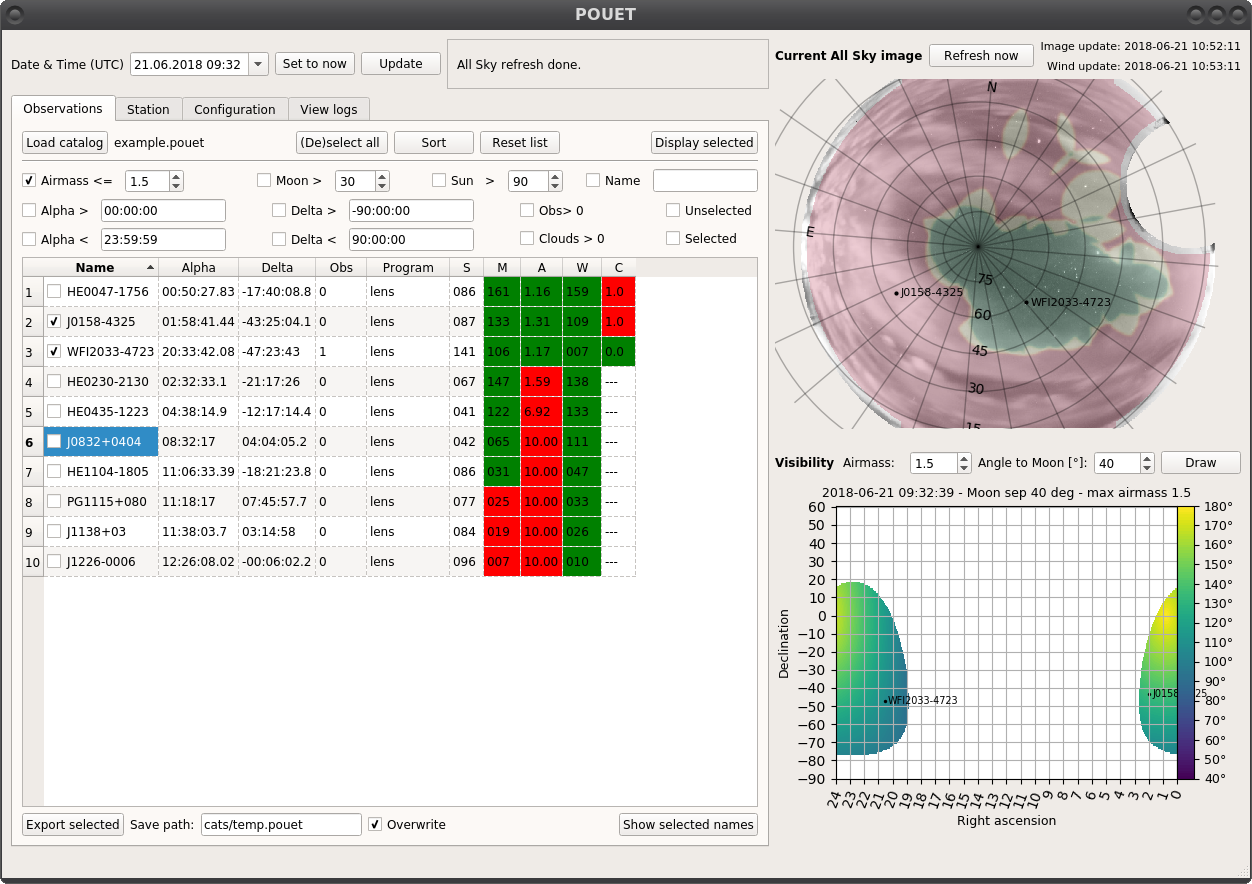
Targets displayed on the visibility view
Extra plots
Upon right-clicking on a target in the list view, a drop-down menu will appear, giving you access to additional useful plots for the selected target. Currently, two options are available:
Show sky chartopens a pop-up where you can query existing large sky surveys (currently DSS, NEAT and 2MASS-J) for a finding chart of your target.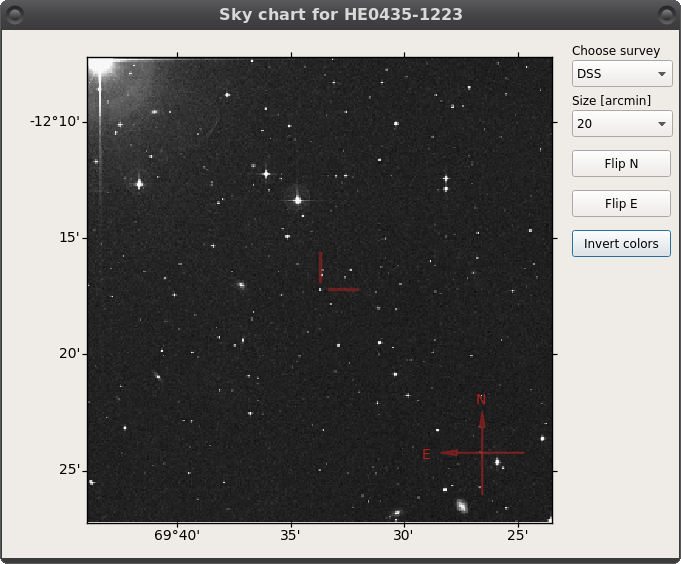
Sky chart of HE0435-1223
Show airmassopens an pop-up displaying the evolution of the airmass of your target over its visibility range during the current night, in an Altitude-Azimuth radial grid.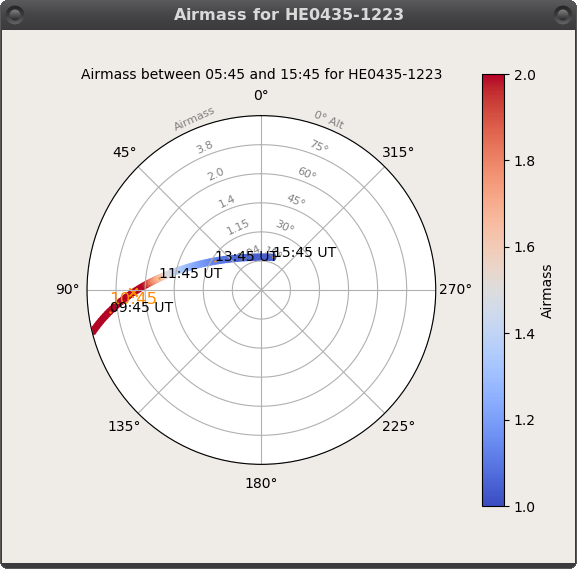
Airmass evolution of HE0435-1223 over night
Change the current time
If you want to plan ahead (or in the past, who are we to judge), you can use the time box at the top left of the main window to change the date and time of the observations. Once set, click on Update to refresh the values displayed in your target list. If you are more than 30 minutes away from the current time, both the clouds and wind values are disabled in the list view.
HE0047 will still be visible in July 2222. No wind or clouds prediction, though.
Note
The all-sky view still displays the up-to-date all-sky image. This is designed to remind you of the current weather situation.
You can come back to the current time by clicking on Set to now, then Update.